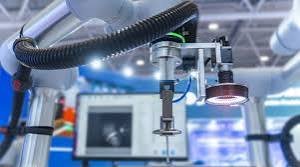
In today’s fast-paced manufacturing landscape, precision is paramount, especially when dealing with high-speed production lines in industries such as metal sheet, automotive, textiles and other sheets. Detecting micron-level defects — such as tiny scratches, cracks, or inclusions — can significantly impact the quality and durability of products. To achieve the level of precision required, manufacturers turn to advanced machine vision systems. These systems, equipped with high-speed cameras, powerful sensors, and specialized lighting techniques, ensure that even the smallest defects are detected in real-time.
This article will highlight the top five machine vision technologies that are transforming defect detection and quality control for high-speed manufacturing.
1. Line-Scan Cameras: Real-Time Monitoring for Continuous Inspection
When it comes to inspecting continuous sheet materials — such as metal sheets, plastic films, or textiles — line-scan cameras or CIS imaging are the go-to solution. Unlike traditional area-scan cameras that capture a single 2D image, line-scan cameras capture images line-by-line as the product moves past the camera. This line-by-line scanning allows for seamless inspection without missing any detail, which is essential in high-speed environments.
How Line-Scan Cameras Work:
- Line-by-Line Capture: The camera continuously captures a series of 1D lines, which are then assembled by software into a full 2D image.
- High-Speed Compatibility: With the ability to capture images at extremely high speeds, line-scan cameras can handle hundreds of meters per minute, making them ideal for real-time inspection.
Advantages:
- High Resolution: Line-scan cameras offer very high pixel density, making it possible to detect micron-level defects.
- Wide Coverage: They can cover large, continuous surfaces without losing any details.
Applications:
- Line-scan cameras are commonly used to detect surface scratches, abrasions, and inclusions in continuous materials like metal or textile sheets.
2. Area-Scan Cameras: Versatile Inspection Across Applications
Area-scan cameras capture a full-frame image in a single shot, making them suitable for applications where broader coverage is needed. While these cameras are traditionally used for inspecting stationary or slower-moving products, modern area-scan cameras are now designed to handle high-speed production lines, capturing defects at rapid intervals.
How Area-Scan Cameras Work:
- Frame-by-Frame Capture: These cameras capture individual frames in quick succession, enabling them to monitor fast-moving products with high accuracy.
- 2D Image Processing: The captured images are analyzed using machine vision algorithms to detect surface defects.
Advantages:
- Broad Field of View: Area-scan cameras can capture large areas at once, which is particularly useful when a comprehensive view is necessary.
- High Versatility: They are adaptable and can be used for a range of quality control applications, from defect detection to dimensional measurements.
Applications:
- Area-scan cameras are widely used for inspecting surfaces of static objects or objects moving at moderate speeds, such as in assembly lines.
3. 3D Cameras and Structured Light Systems: Accurate Depth and Surface Profiling
For defect detection that requires depth information — such as identifying surface irregularities or bumps — 3D cameras equipped with structured light or laser triangulation techniques are indispensable. These cameras provide a 3D profile of the product surface, making it possible to detect height-based defects, which are not always visible in 2D images.
How 3D Cameras Work:
- Structured Light Projection: A pattern of light (often stripes or grids) is projected onto the object’s surface, and the distortions in the reflected pattern are analyzed to measure depth.
- 3D Profiling: By capturing both texture and height information, a 3D model of the surface is created, which is crucial for detecting variations in material thickness, bumps, or dents.
Advantages:
- High Precision: Capable of detecting both surface and depth-based defects, allowing for micron-level accuracy.
- Non-Contact Measurement: Provides accurate profiling without physically touching the product, ideal for delicate materials.
Applications:
- 3D cameras are essential in applications that require precise surface measurements, such as coatings, thickness variations, or raised defects in automotive and aerospace manufacturing.
4. CMOS and CCD Image Sensors: Key to High-Resolution and High-Speed Imaging
The type of image sensor used in a camera significantly impacts its performance in defect detection. CMOS (Complementary Metal-Oxide-Semiconductor) and CCD (Charge-Coupled Device) sensors are the two primary types used in machine vision systems. Each has its unique advantages, with CMOS sensors being favored for high-speed applications and CCD sensors known for superior image quality.
CMOS Sensors:
- High Frame Rate: CMOS sensors can capture high-speed images, which is essential for real-time inspection on fast-moving production lines.
- Energy Efficiency: They consume less power, making them suitable for continuous operation.
- High Resolution: Allows for detection of very small defects.
CCD Sensors:
- Sharp Image Quality: CCD sensors offer excellent image clarity, making them ideal for applications where detail is critical.
- Low Noise Levels: They produce less visual noise, although they are generally slower than CMOS sensors.
Applications:
- CMOS sensors are used in high-speed manufacturing where continuous monitoring is required, while CCD sensors are used when accuracy and image detail are paramount, such as in electronics and medical device manufacturing.
5. Advanced Lighting Systems: Enhancing Defect Detection Precision
Lighting is one of the most critical components of machine vision systems, as it helps highlight the contrast between defects and the background material. Selecting the right lighting system — brightfield, darkfield, coaxial, or backlighting — can make a substantial difference in the detection of small defects, especially on reflective or transparent surfaces.
Types of Lighting Techniques:
- Brightfield Lighting: Direct illumination to highlight contrast-based defects like dark inclusions or scratches.
- Darkfield Lighting: Low-angle lighting that highlights surface irregularities such as pits, fine cracks, and scratches on polished surfaces.
- Coaxial Lighting: Reduces glare and enhances defect visibility on reflective materials, using a beam splitter to direct the reflected light into the camera.
- Backlighting: Placed behind the object to detect edge defects, dimensional inconsistencies, or fine cracks in thin materials.
Applications:
- Brightfield lighting is used for defect detection in flat, matte surfaces, while darkfield and coaxial lighting are ideal for detecting defects on reflective surfaces like polished metal sheets.
Meeting the Challenges of Micron-Level Defect Detection
Detecting micron-level defects on fast-moving sheets is challenging, given the high speed of production lines, environmental factors, and the sheer volume of data generated. To tackle these, manufacturers are increasingly using edge computing and AI-driven algorithms for real-time data processing and defect classification.
Edge computing allows for data to be processed locally, enabling faster response times and reducing network demands. AI-based algorithms further improve defect detection accuracy by learning from vast image datasets, thereby reducing false positives and adapting to changing production conditions.
As machine vision technology continues to evolve, new trends are emerging. AI-powered vision systems are becoming more common, allowing for predictive maintenance and proactive quality control. High-resolution cameras with faster frame rates are also on the horizon, providing even finer detail in defect detection at high speeds.
By leveraging these five key machine vision technologies, manufacturers can enhance their quality control processes, reduce waste, and improve efficiency on high-speed production lines. With ongoing advancements in sensors, cameras, and lighting, the future of micron-level defect detection in high-speed manufacturing looks brighter than ever.


